eSIM Installation Guide (Android)
Updated on 07/02/2024
Before you start:
- In order to use your eSIM you need to install and activate it. Both processes are described in this guide.
- Your mobile device has to be compatible with eSIM technology. In the following link you can check all the mobile devices compatible with eSIM technology.
- You must have the QR code on another screen or printed out so you can scan it using the mobile device's camera.
- The mobile device must be connected to the internet (a Wi-Fi network or mobile data) during the installation of the eSIM.
- Each QR code can be installed only once.
- If you delete the installed eSIM it cannot be scanned again.
Installation
1
Go to Settings
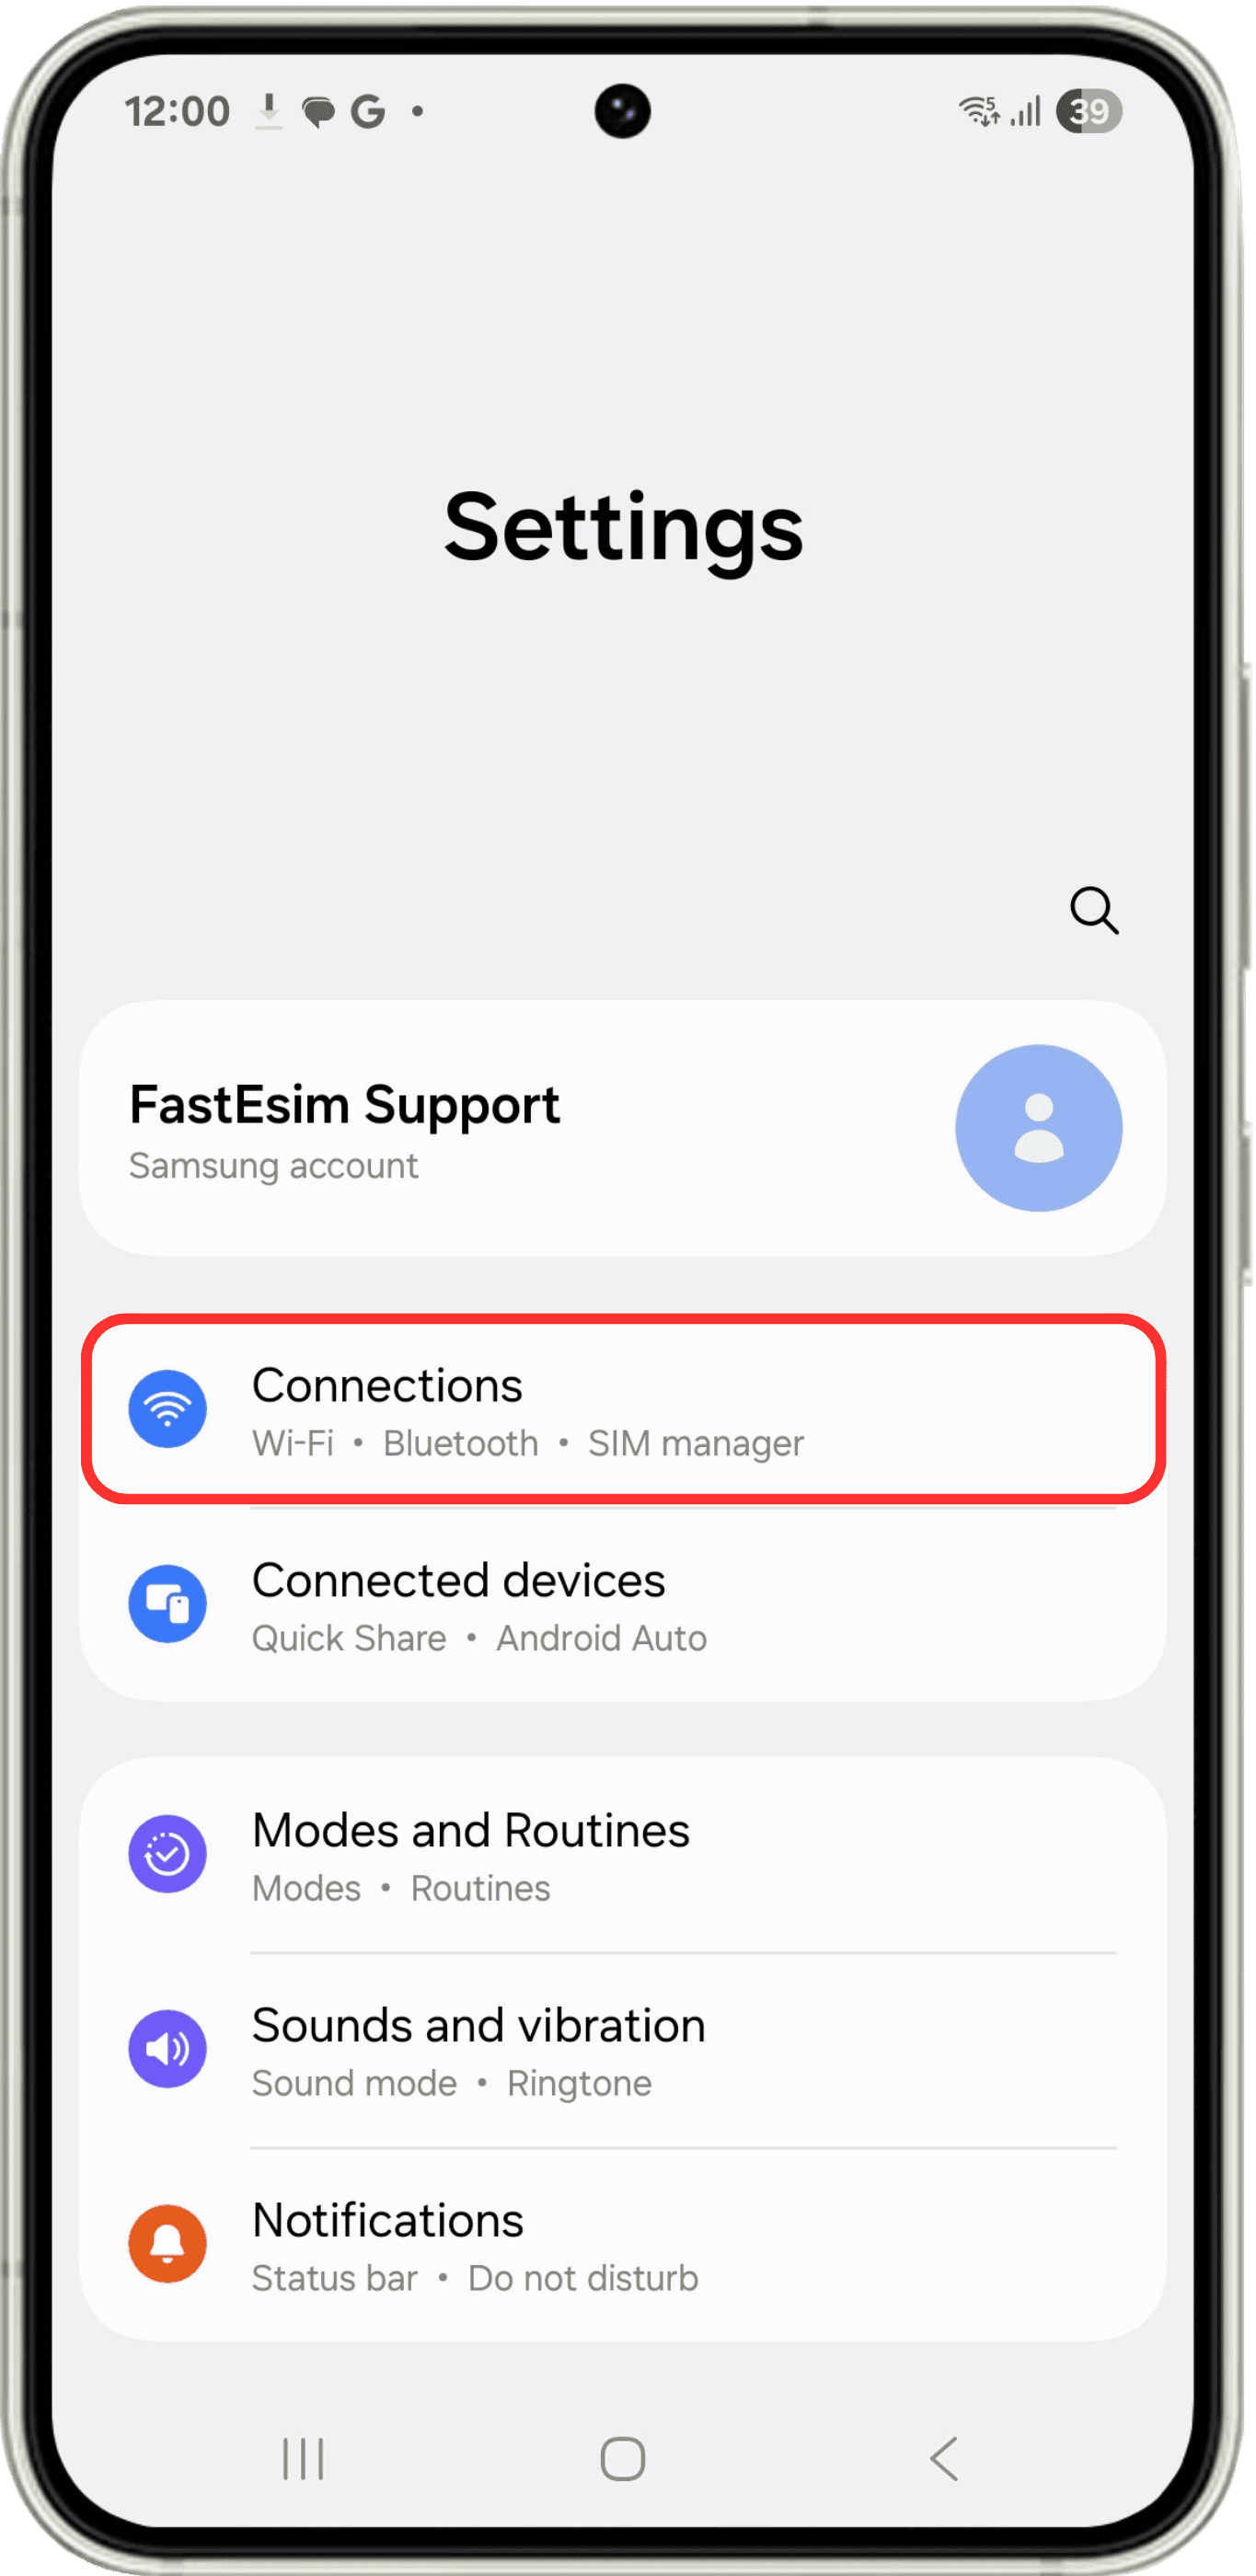
Enter Settings on your device, make sure you have a stable internet connection to perform the installation and then click on Connections.
2
SIM Manager
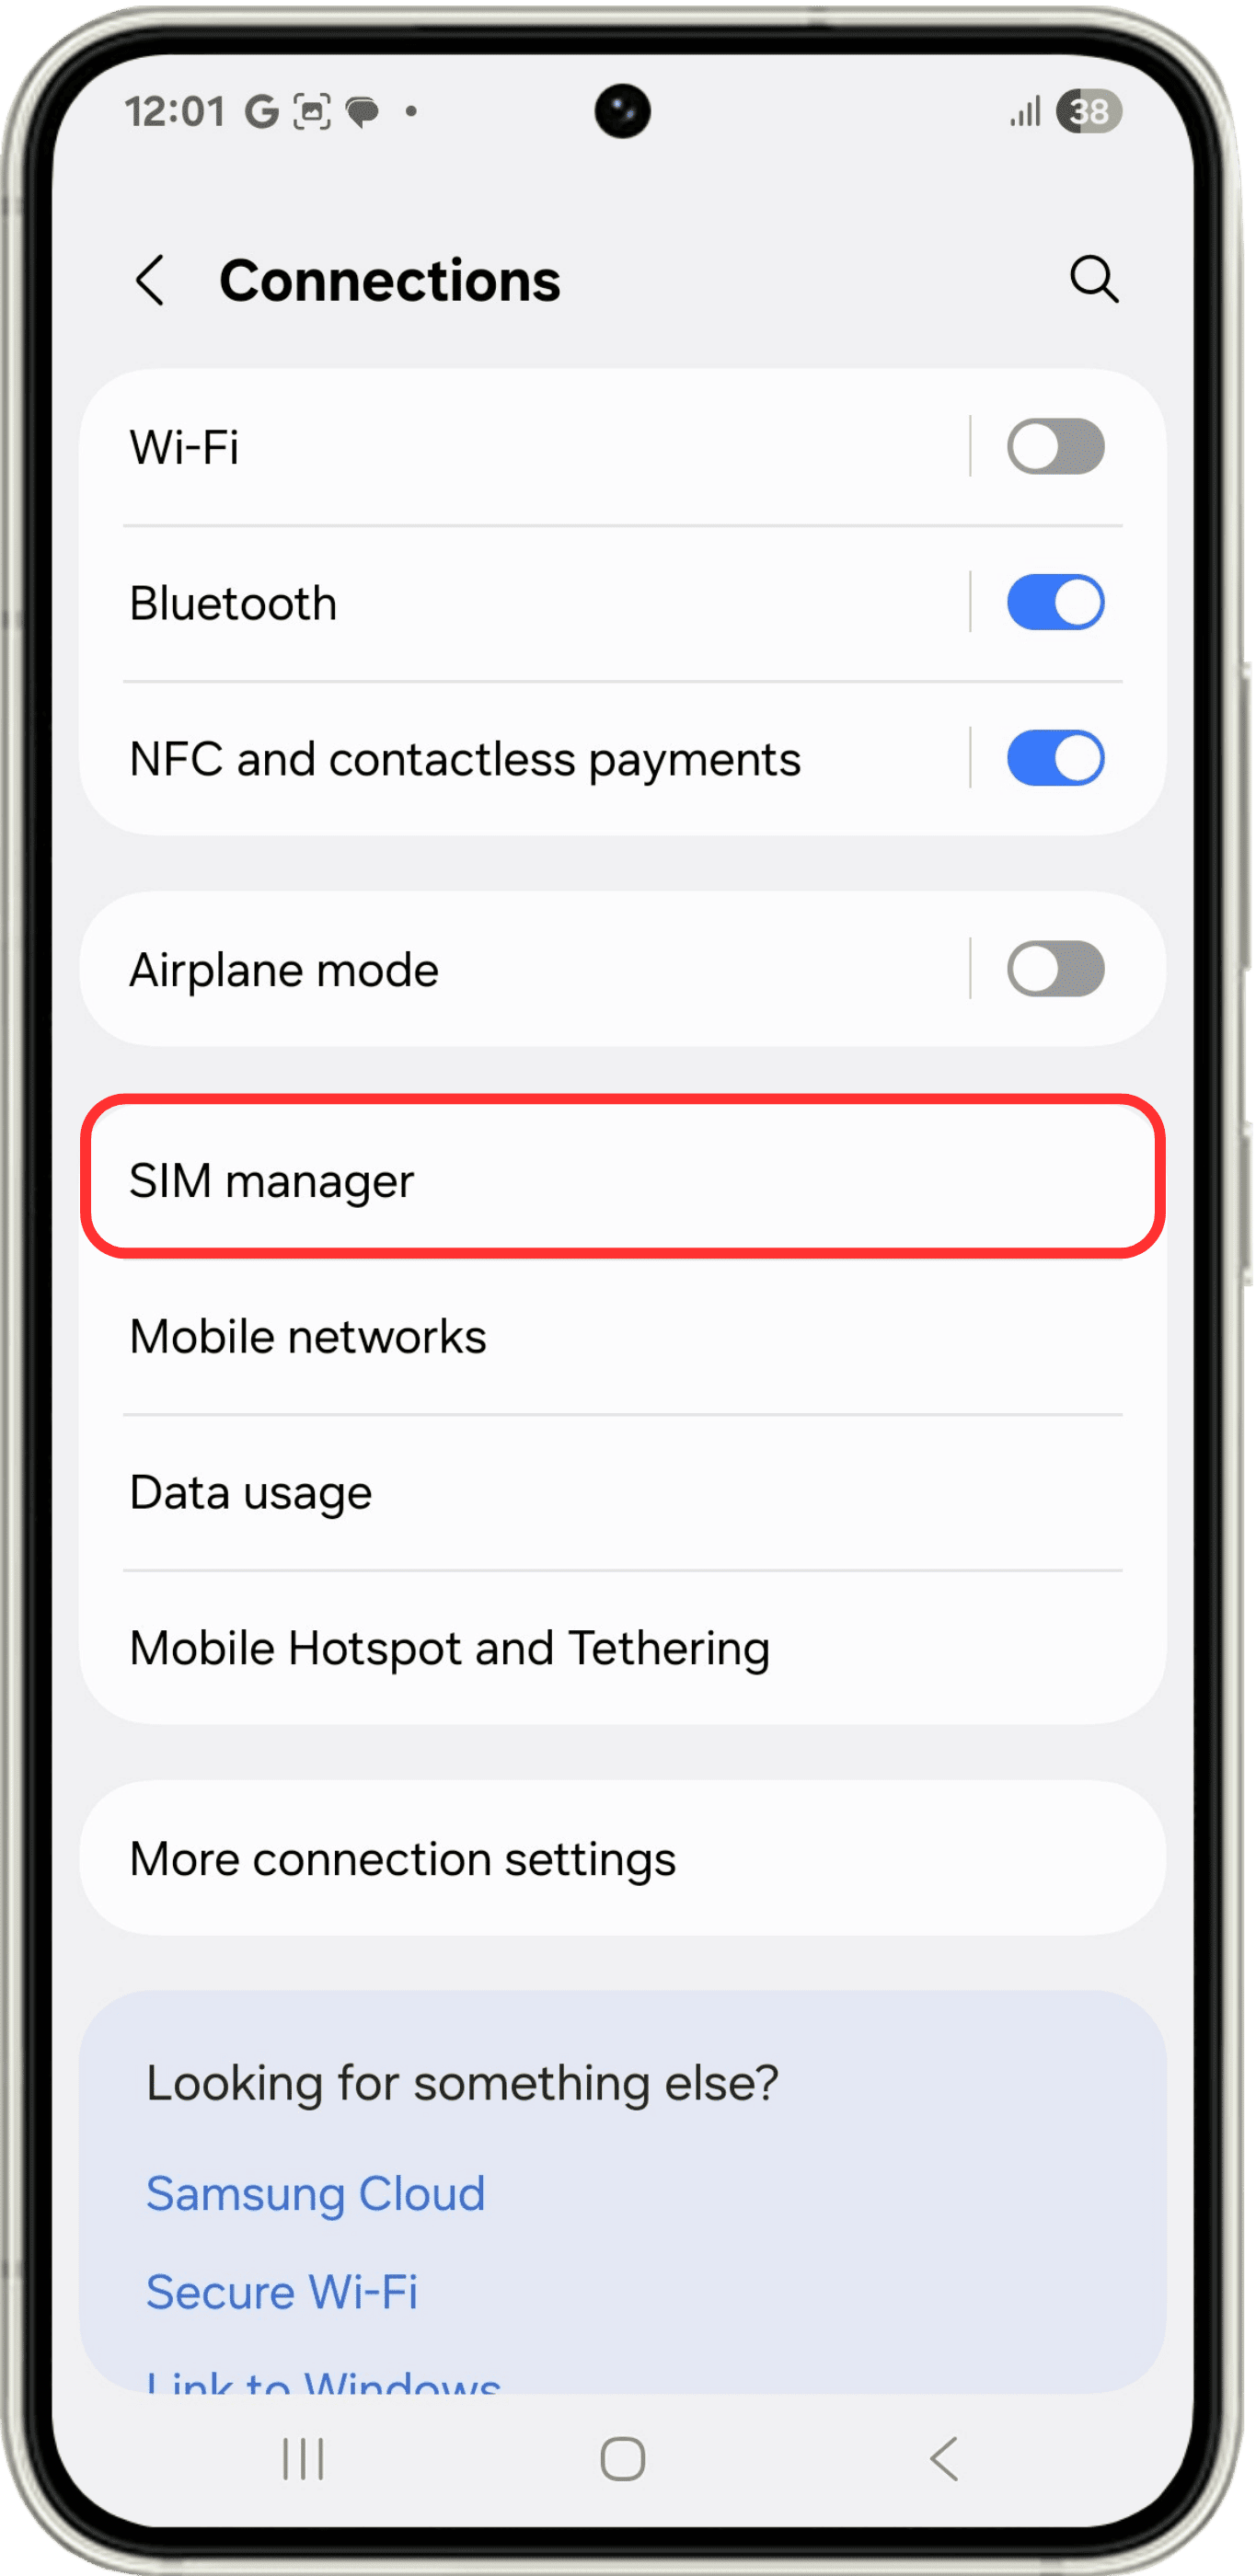
When you are in "Connections", click on SIM manager.
3
Add the eSIM
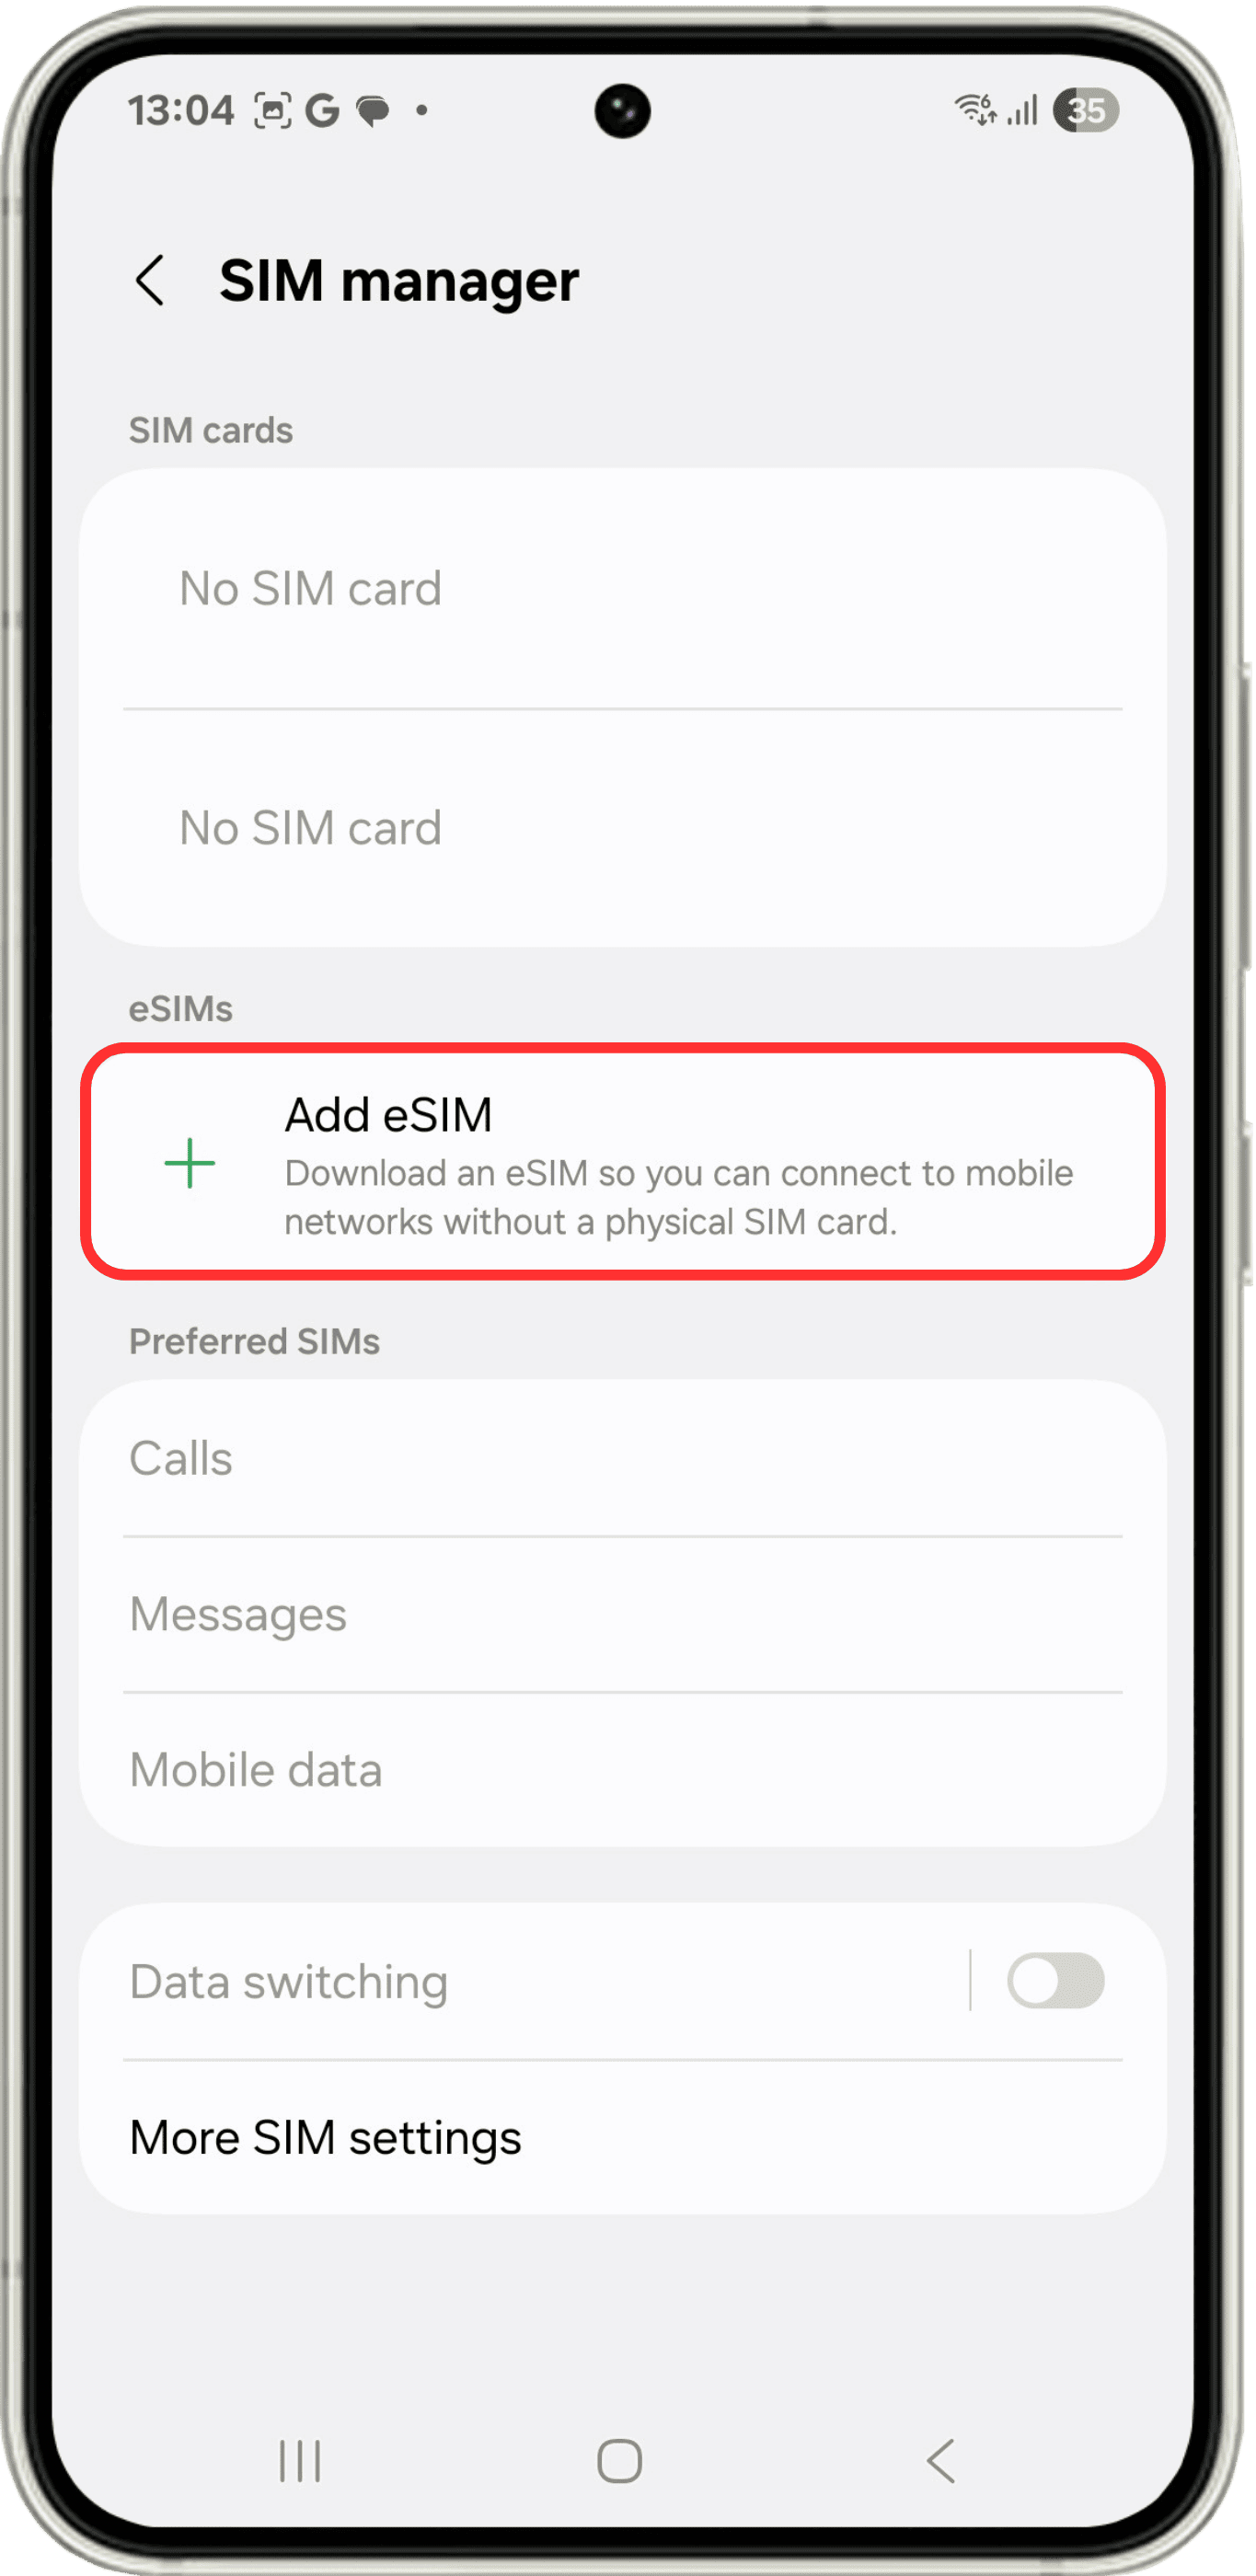
Under the "eSIMs" section, click on Add mobile plan or Add eSIM to start the installation process.
4
Choose the installation method
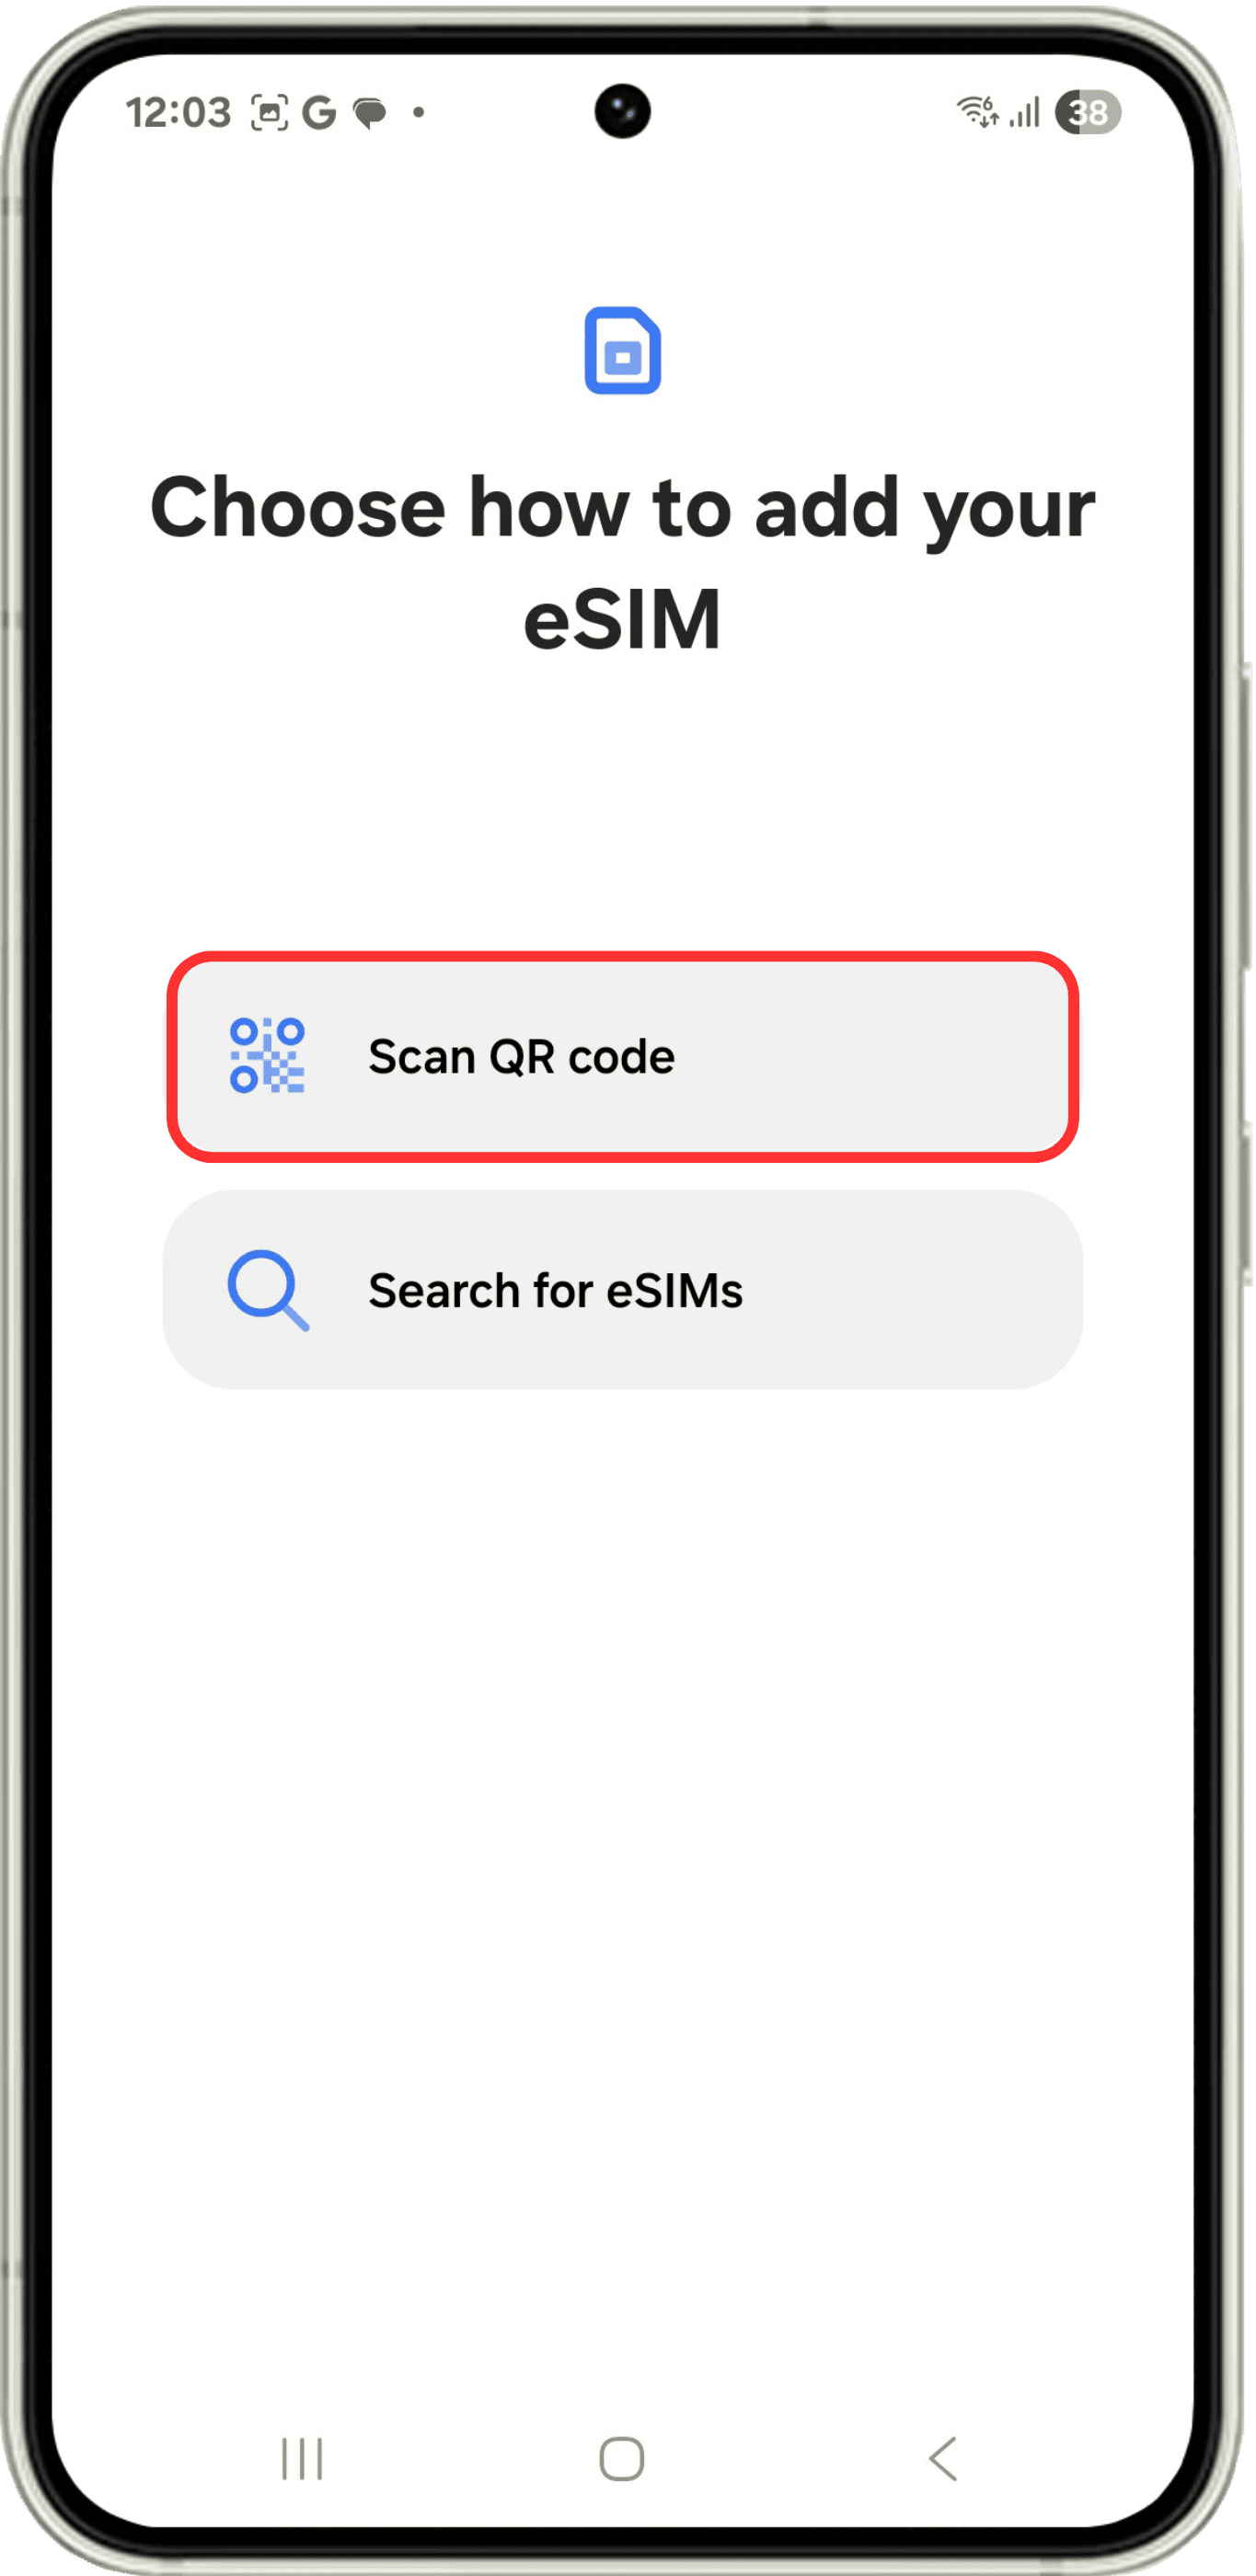
To go ahead and scan your QR code, click on Scan QR code. Remember to have your QR code handy.
5
Scan the QR code
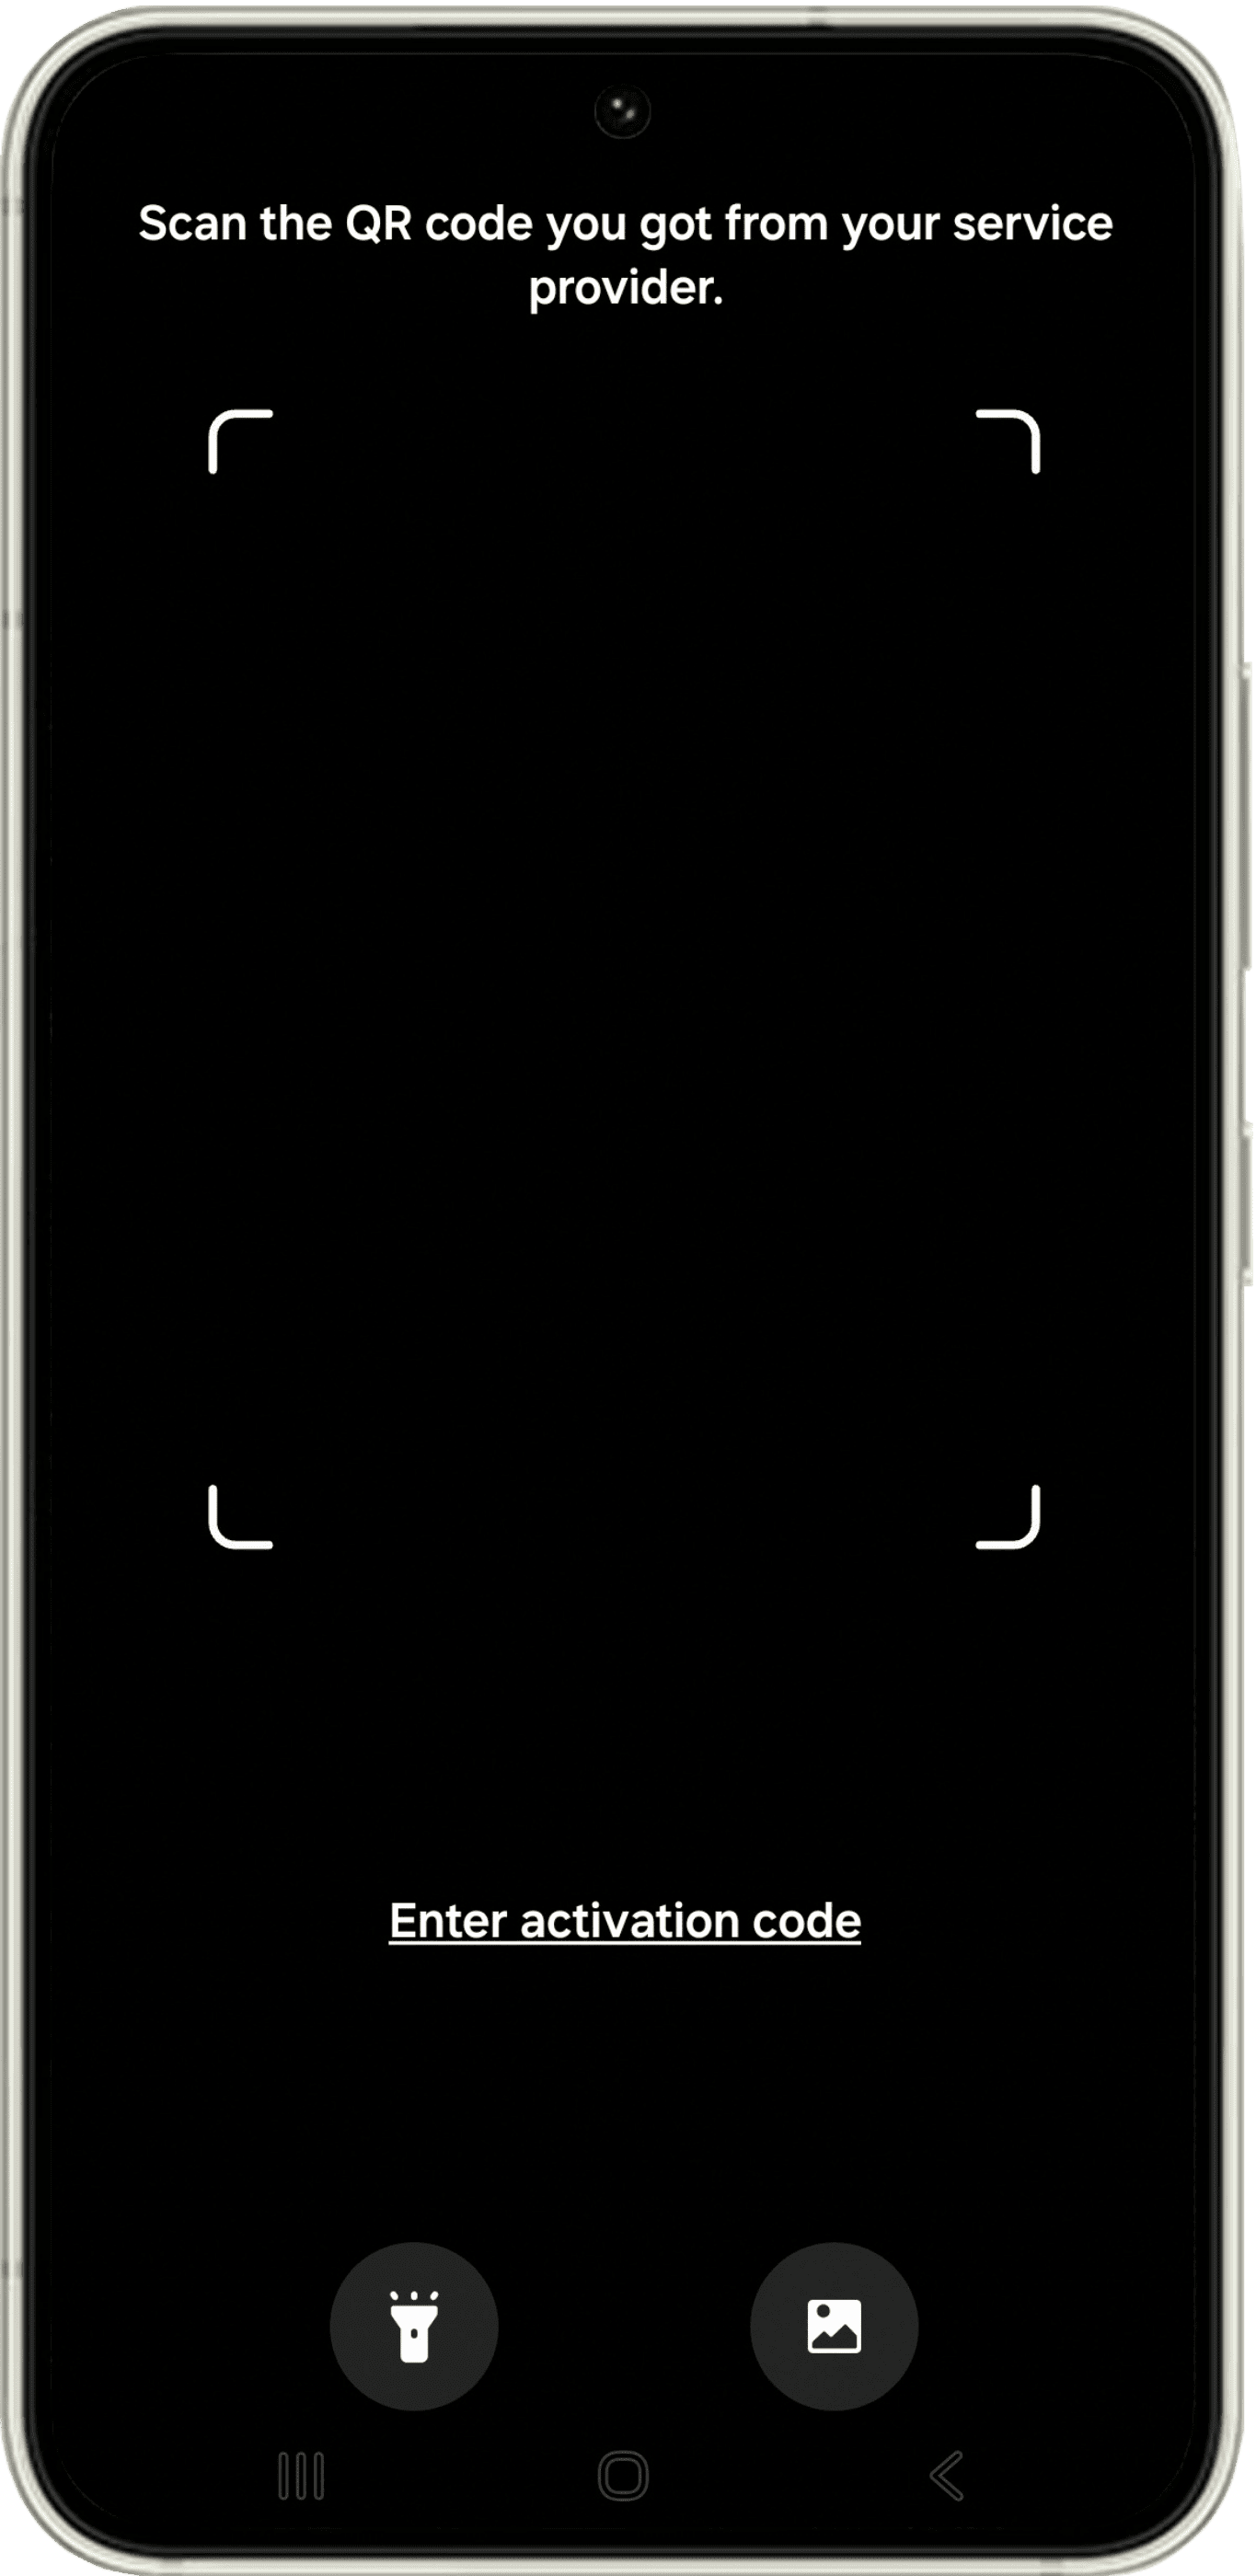
Position your mobile device's camera to scan your QR code and wait a few seconds while your new eSIM is detected.
6
Final step
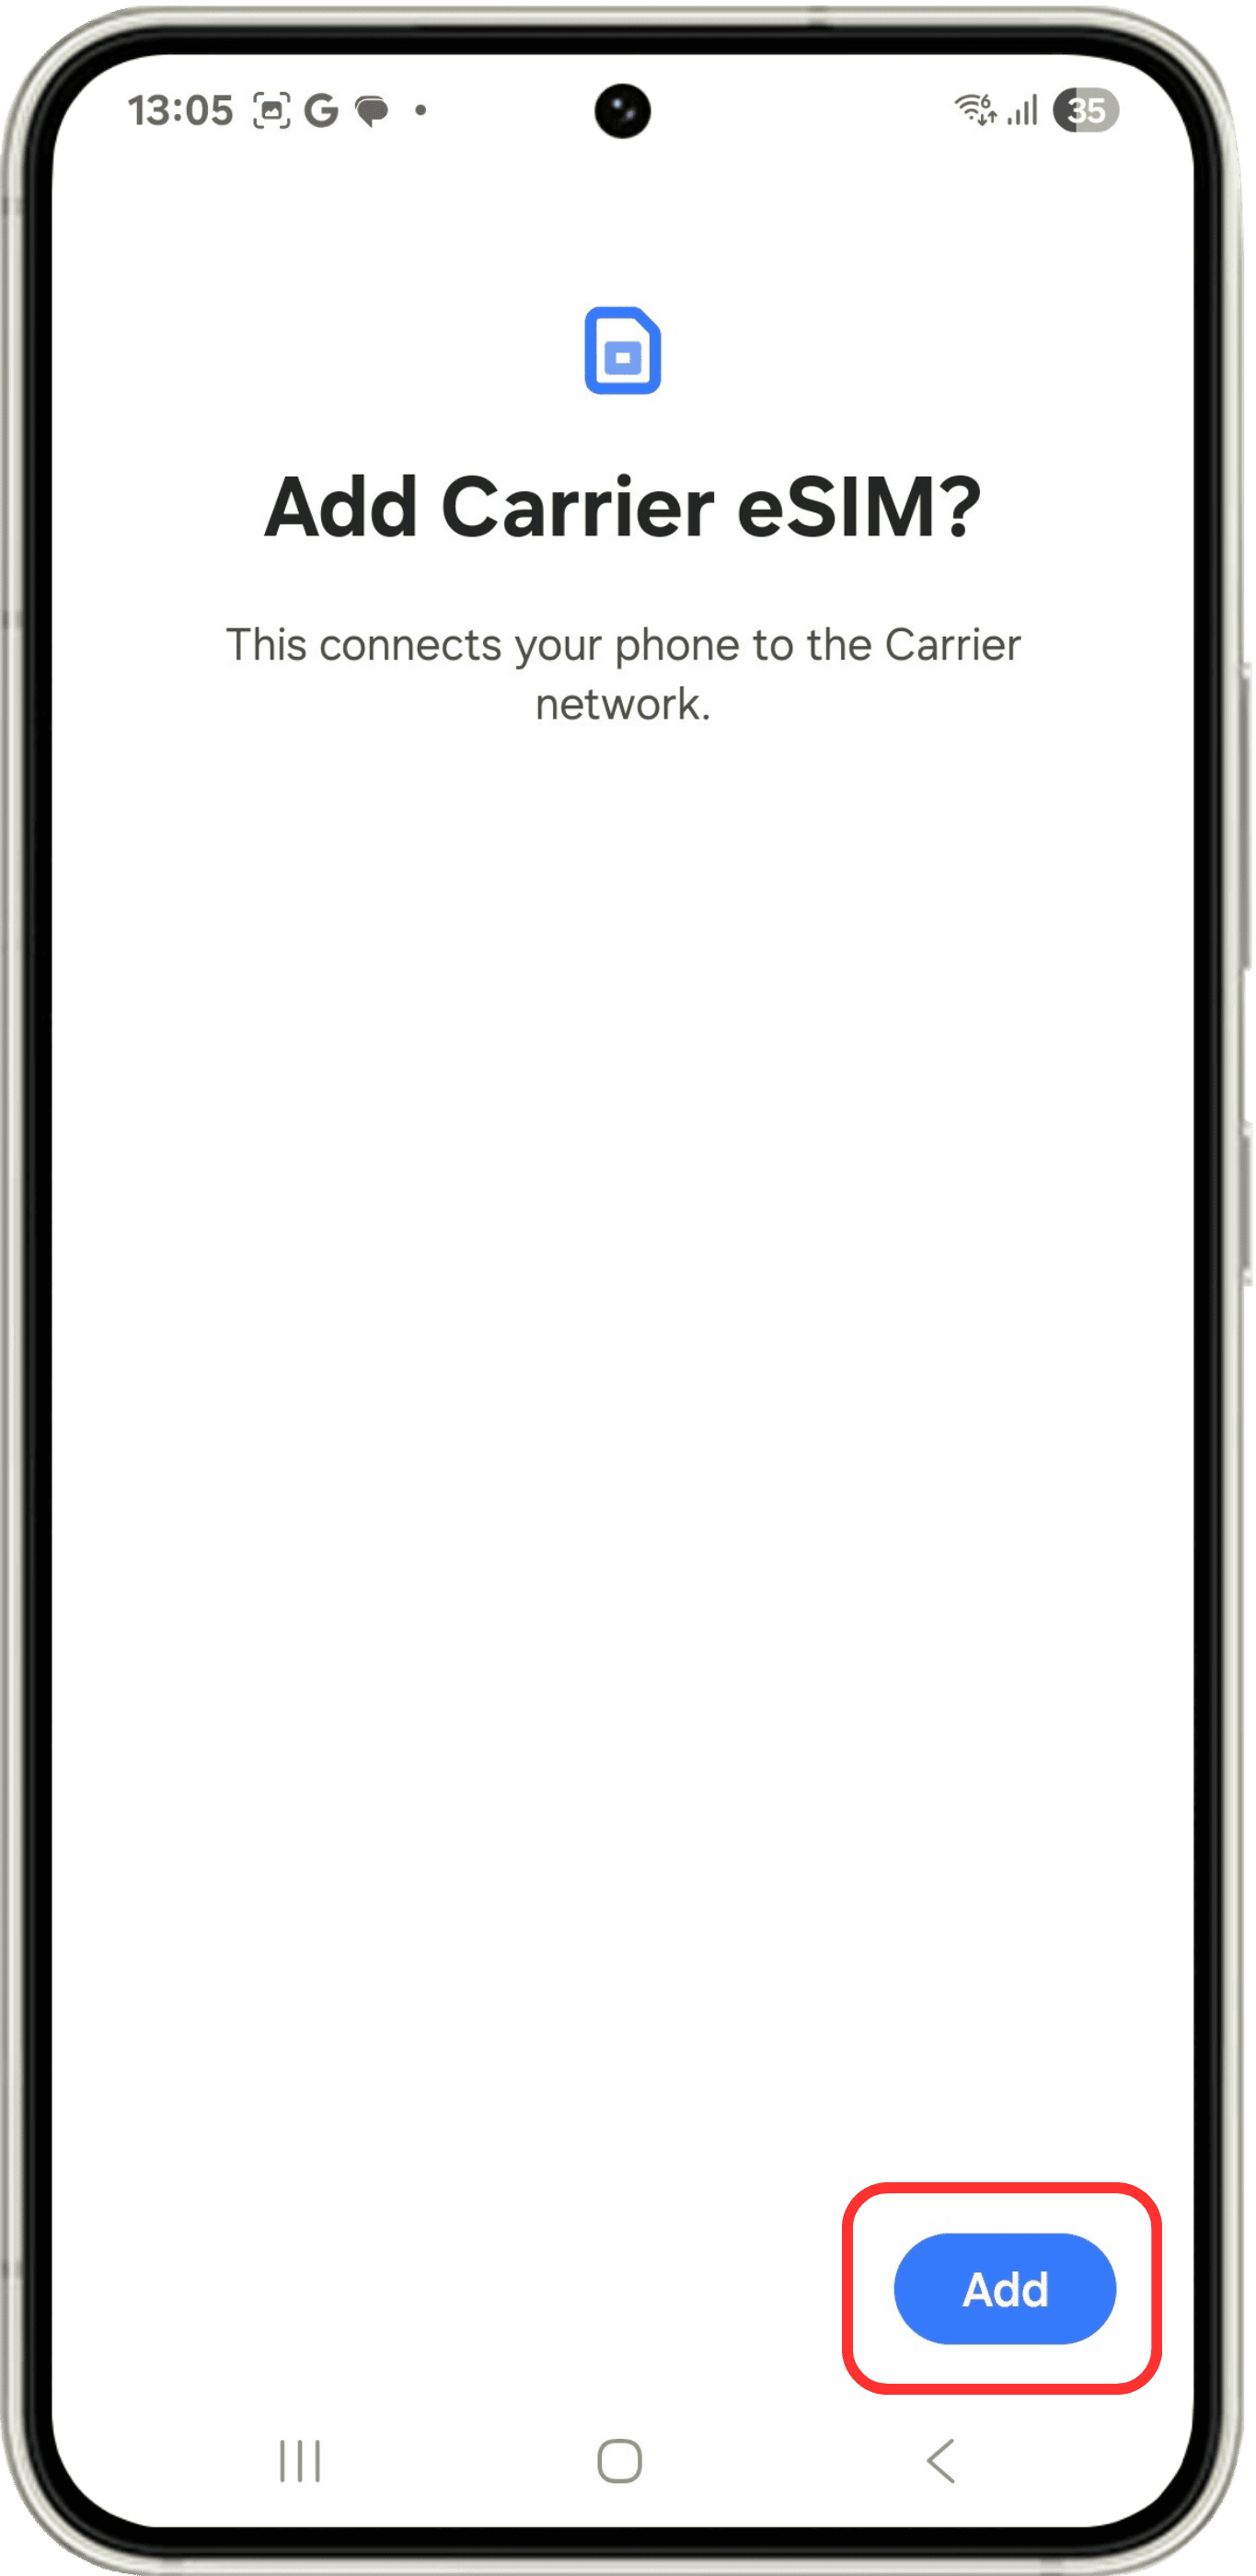
The device will ask you if you want to Add and Activate your new eSIM.
Activation
7
SIM manager
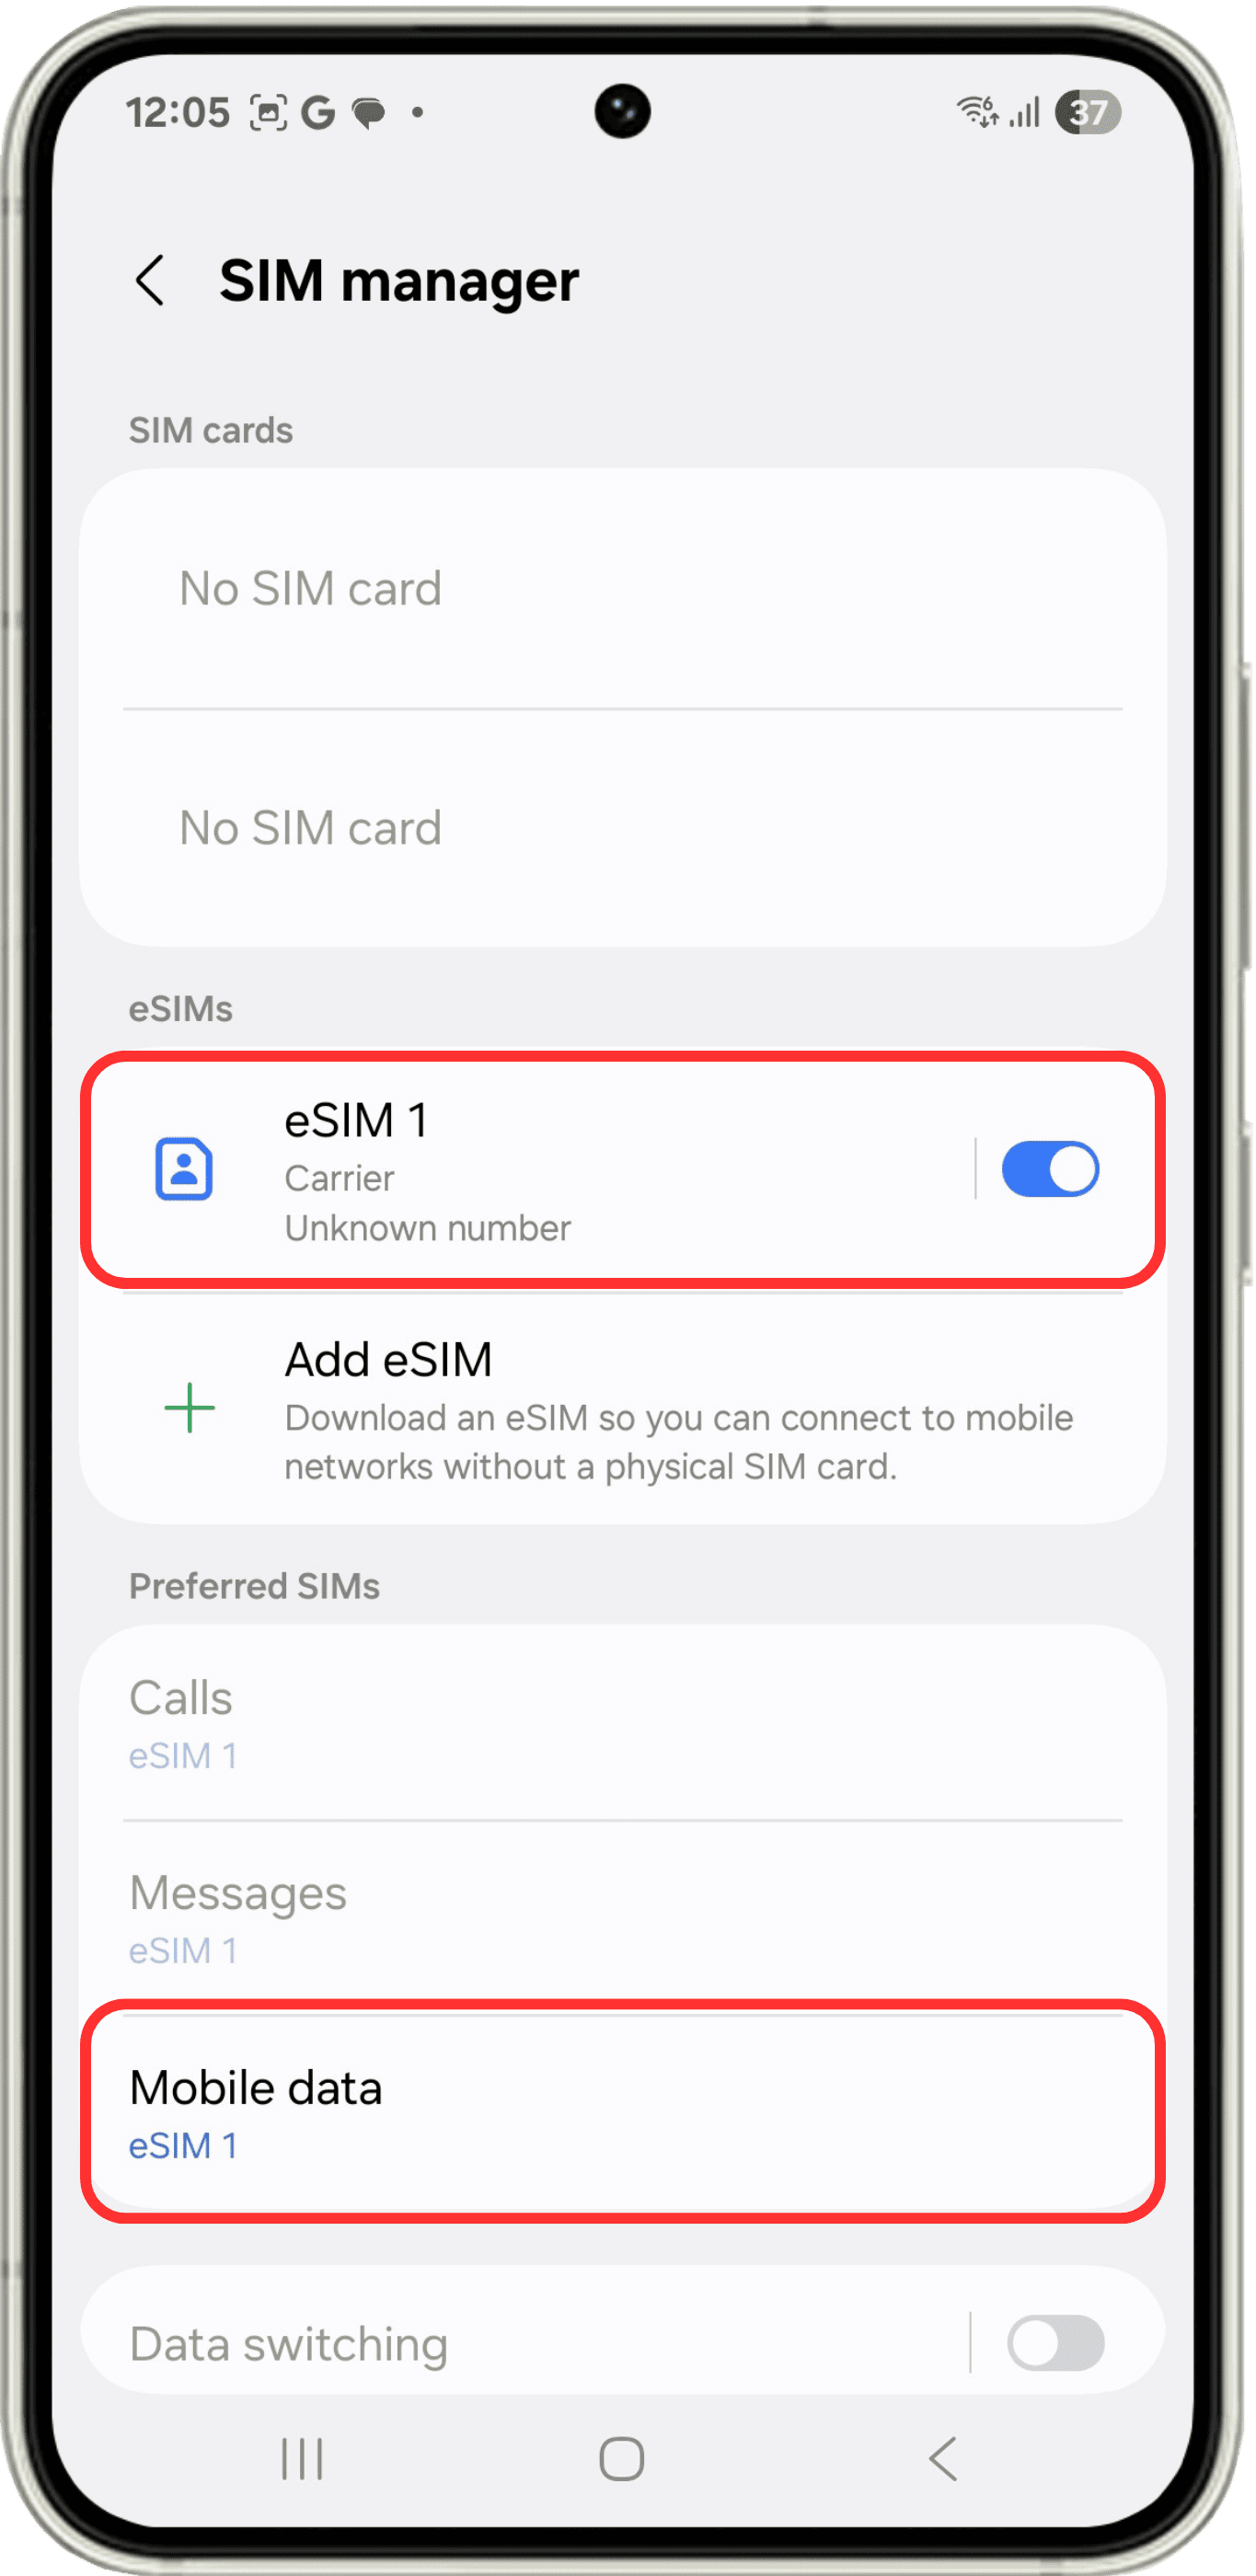
Go to SIM manager, as described in "Step 2" of the installation process. In the "Preferred SIM card" section click on Mobile data and select your new eSIM. Go back to SIM manager and select your new eSIM.
8
Activate and label
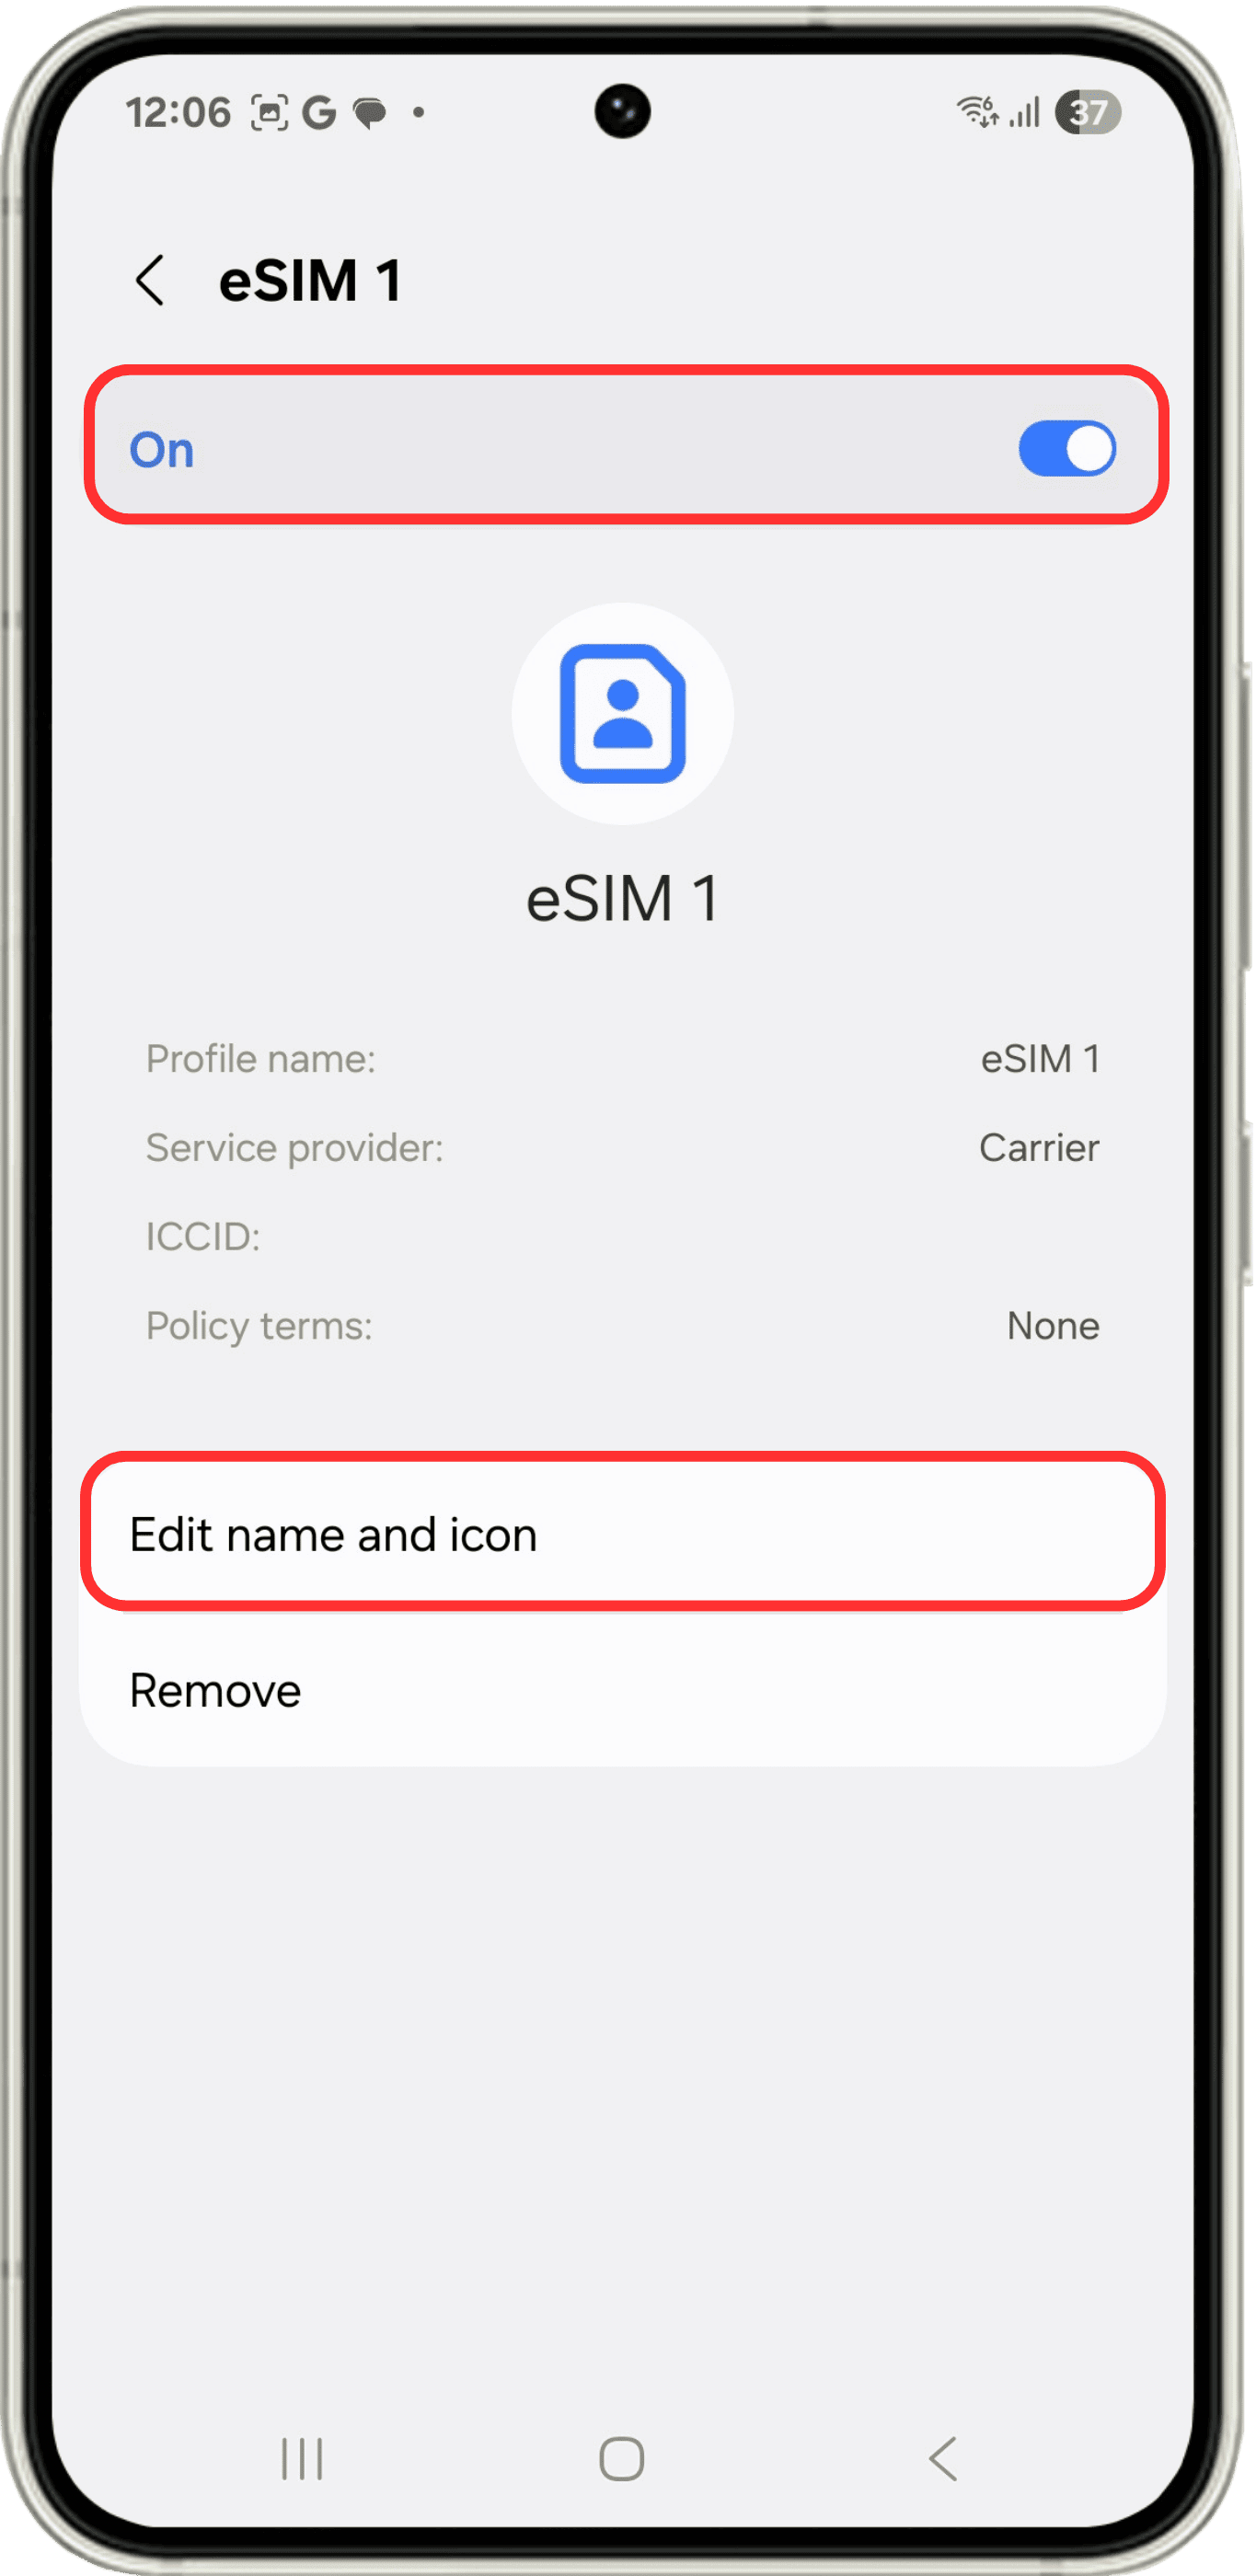
Once you have selected your new eSIM, activate it. Additionally, it is recommended to give it a distinctive name. For example "FastEsim Italy". To do this click on Edit name and icon and enter the name of your choice.
9
Activate roaming
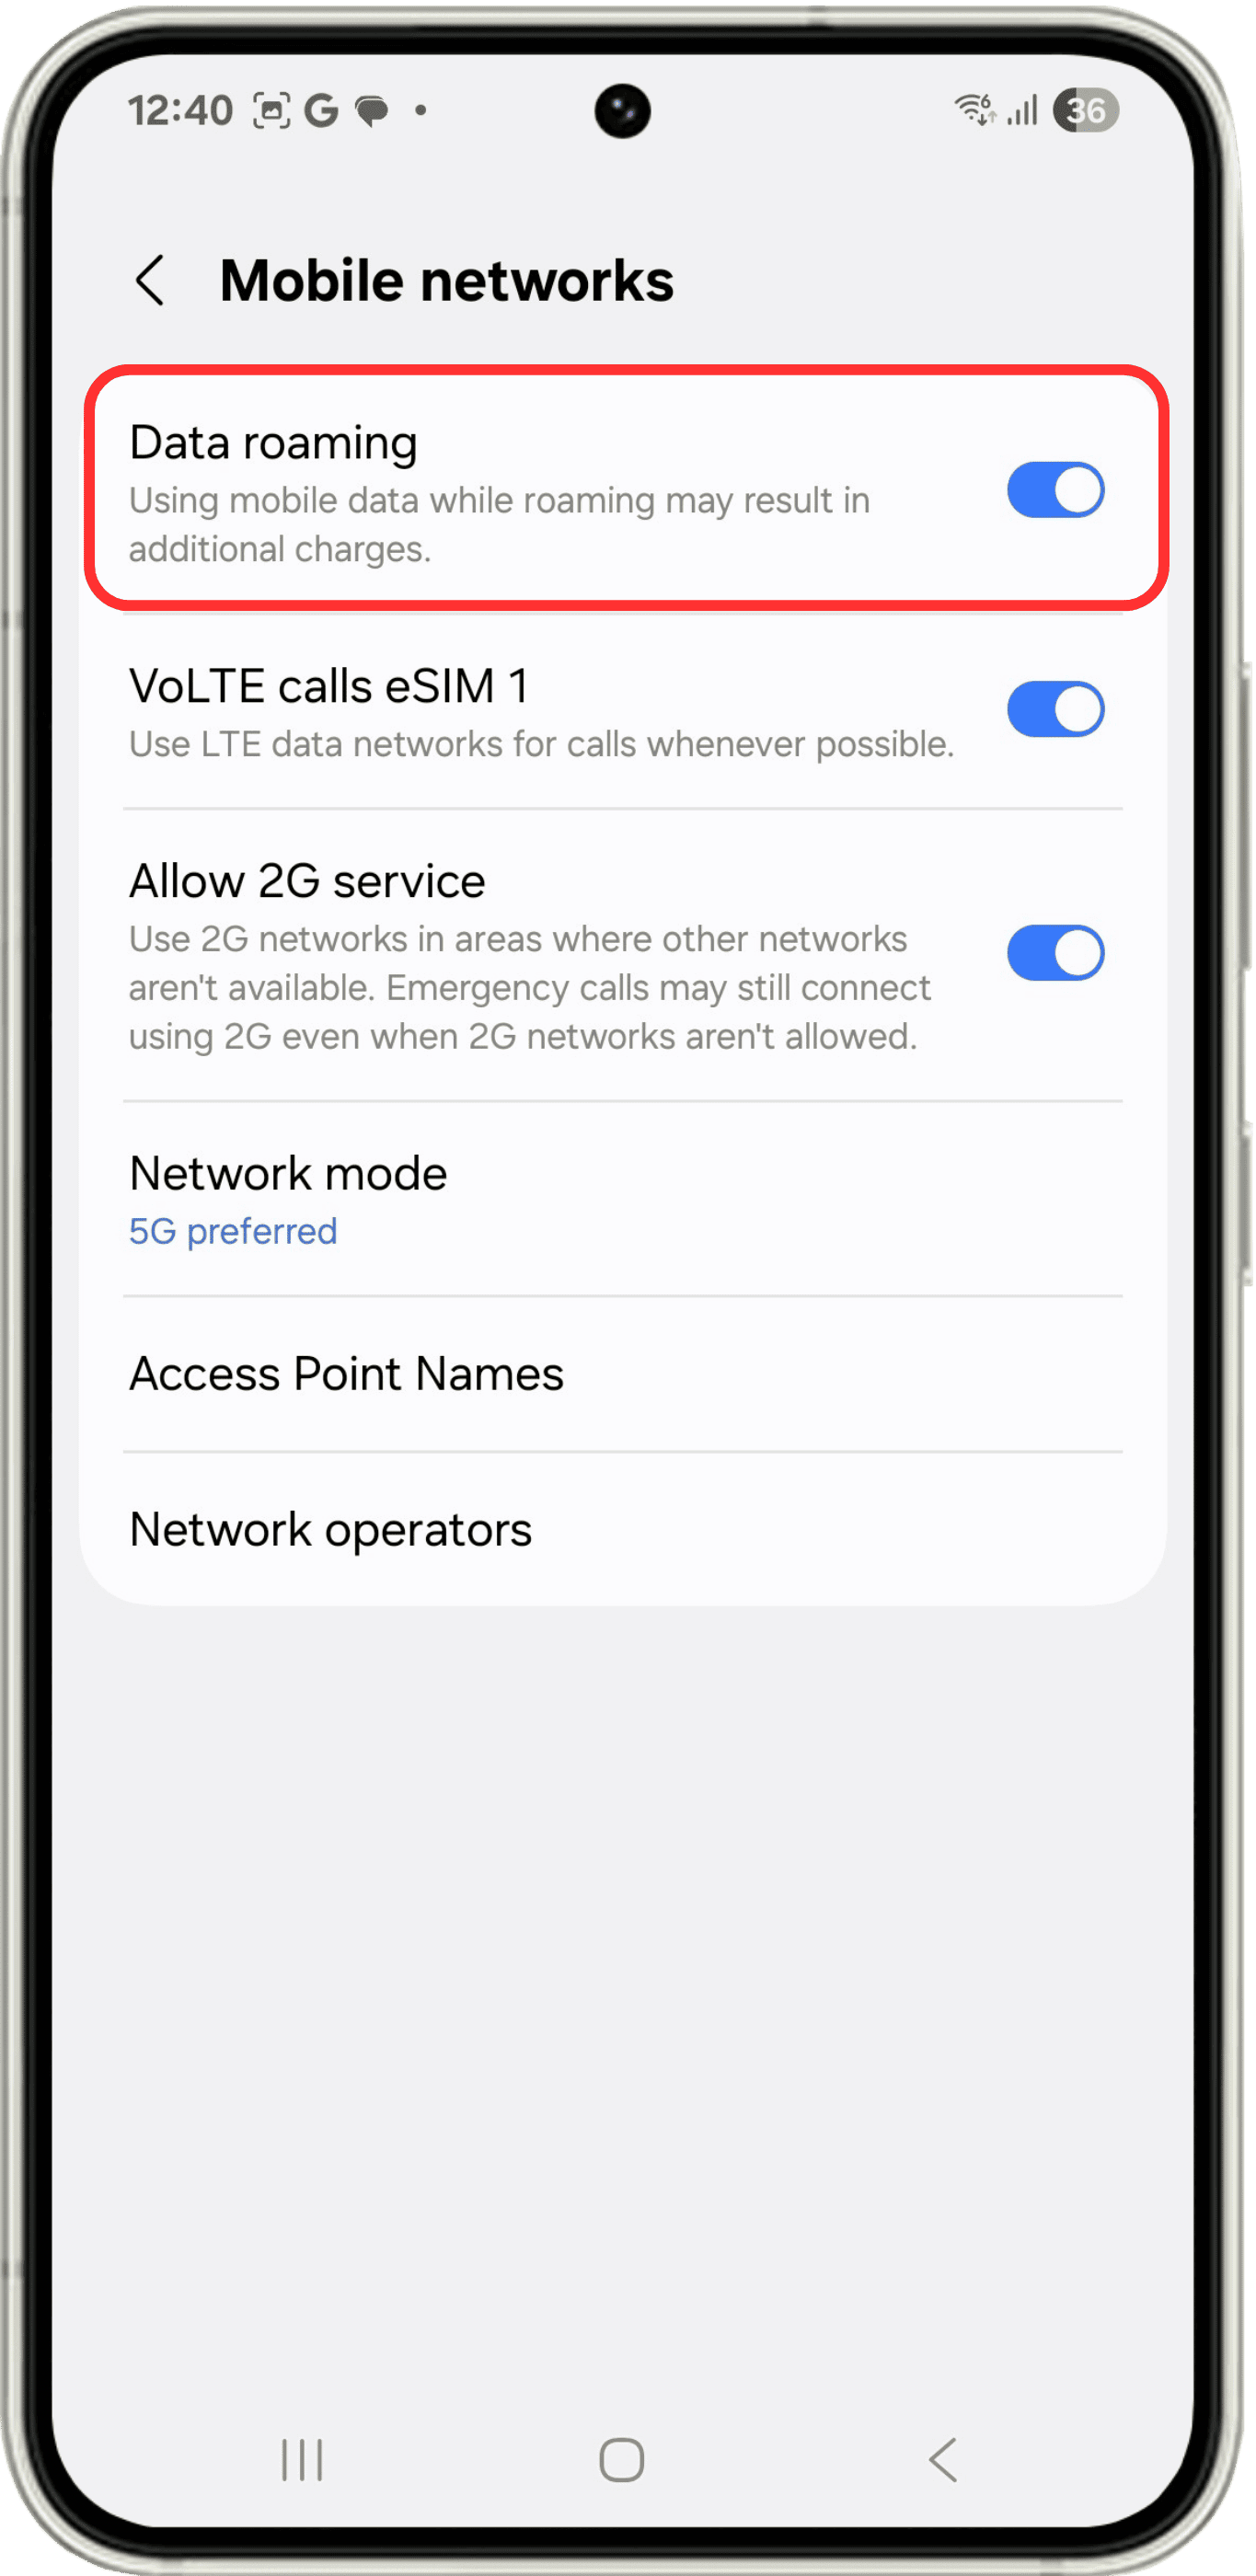
Go back to Connections, as described in "Step 1" of the installation process, click on Mobile networks and make sure to activate Data roaming.
We recommend:
- Perform the installation process of your eSIM before starting your trip and perform the activation process of your eSIM during your flight or when you have arrived at your destination.
- Deactivate the roaming option on your physical SIM or eSIM that you use regularly to avoid roaming costs.
Your eSIM is activated and ready to use!
Do you have any doubts?
Our frequently asked questions can help you
Your eSIM will be sent to the email associated to your account and will also be available in your account. If you can't find your eSIM you can contact our support by email or WhatsApp and we will be happy to help you.
No configuration is necessary to keep your WhatsApp number. When you activate one of our eSIMs your WhatsApp phone number will remain the same.
Once the QR code is received and scanned, the activation takes less than a minute. Remember that you need to be connected to the internet, either through a WiFi connection at home or in your hotel, to be able to activate your eSIM.
In order to send SMS messages and make calls, the eSIM must include a phone number. FastEsim eSIMs do not include a phone number. However, with mobile data you will be able to use your favorite instant messaging applications such as WhatsApp or iMessage and make VoIP calls with these same applications.
The validity of your eSIM starts to run from the first connection made to the network in your selected country or destination. Consequently, you can activate your eSIM before starting your trip without any problem.
Yes, you can keep your physical SIM or your local eSIM and simultaneously use a FastEsim eSIM.
Once you have finished using your eSIM you can go into your device's settings and delete it if you wish. Depending on the model of your device you can have up to 20 eSIMs saved.
You can check your eSIM usage from your FastEsim account on our website.
Yes, you can. Unlike other companies that do not allow it, it is possible to share data to other devices with our eSIM.
All FastEsim packages have the ability to connect to 3G/4G/5G. The type of connection will depend on the country and the specific location where you are. You can check the speed of each bundle in the technical data sheet.
The QR code to install and activate your eSIM will be sent to the email address associated with your account and will also be available in your account. The QR code is generated within seconds of placing your order and will be in your email almost instantly.
No, however, the vast majority of modern smart devices are compatible with eSIM technology. It is important that before placing your order you check in the following link which devices are compatible with eSIM technology.
No, FastEsim's eSIMs do not include a phone number.
Yes, it is possible to receive a refund in specific cases. We suggest you review our refund policy or contact our 24/7 support.
Usually you can have 2 active eSIMs simultaneously or 1 physical SIM and 1 eSIM. Remember that you can deactivate an eSIM without deleting it and then reactivate it.
No. One of the features of the eSIM is that it can be activated only on one device. You cannot transfer the eSIM to another device and you cannot rescan the QR code on another device.
Installing an eSIM is a very simple process even for people who are not very familiar with technology. At FastEsim we have written a tutorial to activate eSIMs on iPhone devices and to activate eSIMs on Android devices.
We have several types of packages. These can be local (one country only), regional or global. We even have eSIMs with local coverage that allow you to navigate in different countries. If you are going to visit several destinations, don't worry, you can use the same eSIM as long as you choose the right one. You will be able to see all these details clearly during the purchase process.


